
Trim, Fillers, & Molding
Scherr's Cabinet & Doors' primary focus is written there in our name - Cabinets and Doors. However, it is nearly impossible to get trim, filler, and molding that perfectly matches your doors and cabinet components unless they come from the same place and are finished alongside those primary components. This is why we have developed the means to manufacture a limited line-up of trim, filler, and molding. Since our primary products are largely purchased by the Do-It-Yourselfer, we thought it necessary to set up this page. This is a brief guide dedicated to displaying what we offer, how to determine what you need (or want), and how to communicate that to us when you place your order.
It is worth saying that if you look through our line-up and do not see what you want, that it is possible to work with outside manufacturers in order to end up with the right look for your project. If something needs to be ordered and sent from somewhere else so that it can be painted or finished alongside your doors or cabinet components, we are willing to consider that as an option. With that being said, let's introduce you to what we can make here in our shop.
We're happy to say our trim and molding is made from 100% solid hardwood. When you order trim and/or molding alongside our cabinets and/or doors, great care is taken (whenever possible) to match the wood species, cut, and overall character of the wood used to make the trim with the doors and cabinet components. No guarantees can be made that it will be a perfect match, unless you are purchasing a select or premium grade wood. Our sales team can help advise you on which types of trim/molding will match your doors and drawer fronts with respect to their styles and profiles.
The following pictures show a cross-section of the various types of molding that we can make here in our shop

| Type | Width | Height |
| Quarter-Round | 3/4" | 3/4" |
| Classic Crown: Small | 1-1/8" | 1-1/2" |
| Classic Crown: Medium | 2-3/4" | 2-1/4" |
| Classic Crown: Large | 3-1/2" | 2-5/8" |
| Extra Large Crown: Gentle | 3-1/4" | 3-1/4" |
| Extra Large Crown: Embellished | 3-1/4" | 3-1/4" |
| Light/Crown Rail | 2-1/2" | 1" |
| Shaker Crown | 2-1/4" | 2-1/4" |
| Fascia (Vertical) | 13/16" | Unspecific |
| Support | 2-1/4" | 13/16" |

All Deco-Toe Molding is 13/16" thick and is normally 4-1/4" tall. The lower flat portion of the trim is what is made taller or shorter when the height is altered.
Decorative toe molding is used whenever you want your cabinets to appear to go all the way to the ground without a recessed toe-kick area. In these cases, decorative toe molding is used to dress up the junction between cabinet and floor much in the same way that you would use decorative baseboard molding where a normal wall meets the floor. Additionally, one of our styles of toe molding can be made with a decorative cut-out (see drawing below the cross section.)
How do I order what I need?
When it comes time to include the trim/molding information in your quote request you will need to specify:
- Type of Trim/Molding Needed
- Amount Needed (in feet)
- Wood Species
- Finishing (if different than the rest of your project)
- Repeat this process for each type of trim/molding including Crown Molding, Light Rail, and Decorative Toe Molding.
Type of Trim/Molding Needed
First, familiarize yourself with what we offer (shown in the images near the top of this page.) Second, either identify a configuration for your molding (found in the different 'Configurations' headings on this page below) OR come up with your own configuration made up of the different trim/moldings that we offer. If none of the options we provide interest you, it is possible to purchase molding from a third party provider and have it shipped to us so that we can finish it alongside the rest of your project. If you plan on doing the finishing yourself, then this optional step does not apply to you.
If you have chosen components that can be profiled (i.e. Crown Rail, Light Rail, or Crown Fascia), choose your profile found on our edge profile page.
Amount Needed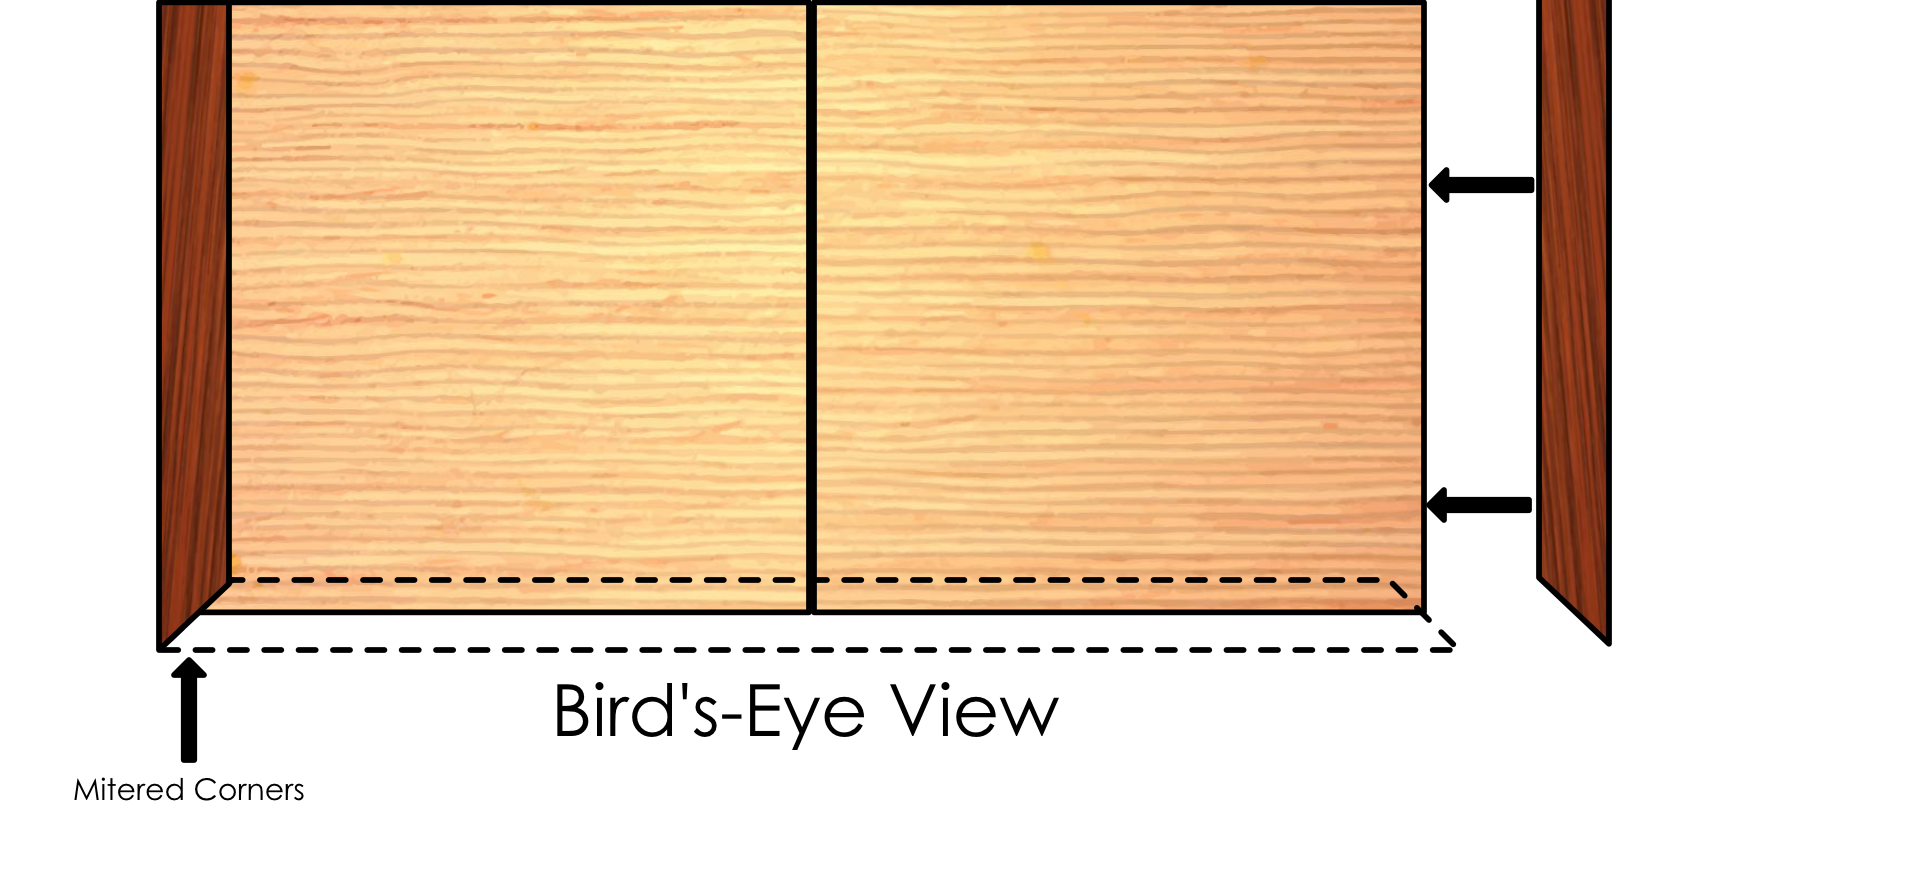
The first thing to know when figuring length, is that our molding comes in 8 ft lengths. (Longer pieces can be made by special request.)
Once you have determined what type(s) of trim/molding you need, you will need to figure out how much of it you need. Most moldings are installed along the outside perimeter of each stretch or set of cabinets, similar to what is pictured here:
Add up every cabinet edge where your trim will be visible. In the example shown, this will be the front, left, and right edges. Do this throughout your installation wherever it applies for the type of molding configuration you are calculating. Once you have this number, it is necessary to include extra since you will be mitering your corners, and will want to avoid using partial lengths wherever possible.
If you will need less than 24 ft throughout your entire project of any particular type of molding then use the following equation.
(Sum of all Edges) X 1.2 ► Round up to the nearest number divisible by 8.
If you will need more than 24 ft throughout your entire project of any particular type of molding then use the following equation.
(Sum of all Edges) X 1.2 ► Round up to the nearest number divisible by 8. Add another 8 ft.
Wood Species
It is almost always best to match your molding to your cabinet doors and drawer fronts. If we can make doors and drawer fronts out of a particular species of wood, then we can make molding from it as well. You will find a list of our wood species here. Our paint grade options include Poplar, and Soft Maple.
Finishing
You will have five options for finishing your trim with Scherr's: Unfinished, Clear, Stained & Clear, Primed Only, and Painted. All of our paints and stains come from Sherwin Williams. If you choose to have your wood stained and you are particular about getting a specific look, we will do our best to work with you (sending pictures and samples if necessary.) If you choose to have your molding painted, we have two 'Standard' colors that we always have on hand that come at a discount compared to custom colors, they are: "Extra White" and "Dover White." If you want to get a custom color, you can go to Sherwin William's color page or visit a Sherwin Williams booth at a hardware store to select which color you want. Please note, the more dark or vibrant your color, the more difficult it becomes to apply without getting surface imperfections. Darker or more vibrant colors typically require more detail sanding between layers and longer drying times, as such we will charge a higher rate per Sq/Ft for these types of paint.
Crown Molding Configurations
Below you will find various configurations to assist you in determining which look you want for your project and what that will require.

Crown Rail
Here you will notice this is an upper wall cabinet viewed from its side. This drawing shows the 1/8" reveal above the door and also the distance that the door sits away from the cabinet box. As such, when a simple crown rail style molding is installed, it will look much like this. This drawing shows the front facing edge of the molding with beveled edges that match the door below it. You'll notice the crown rail piece has been installed to sit flush with the door below it. These are all matters of preference, but this is a common application for a crown rail style molding. This option is very simple and affordable.
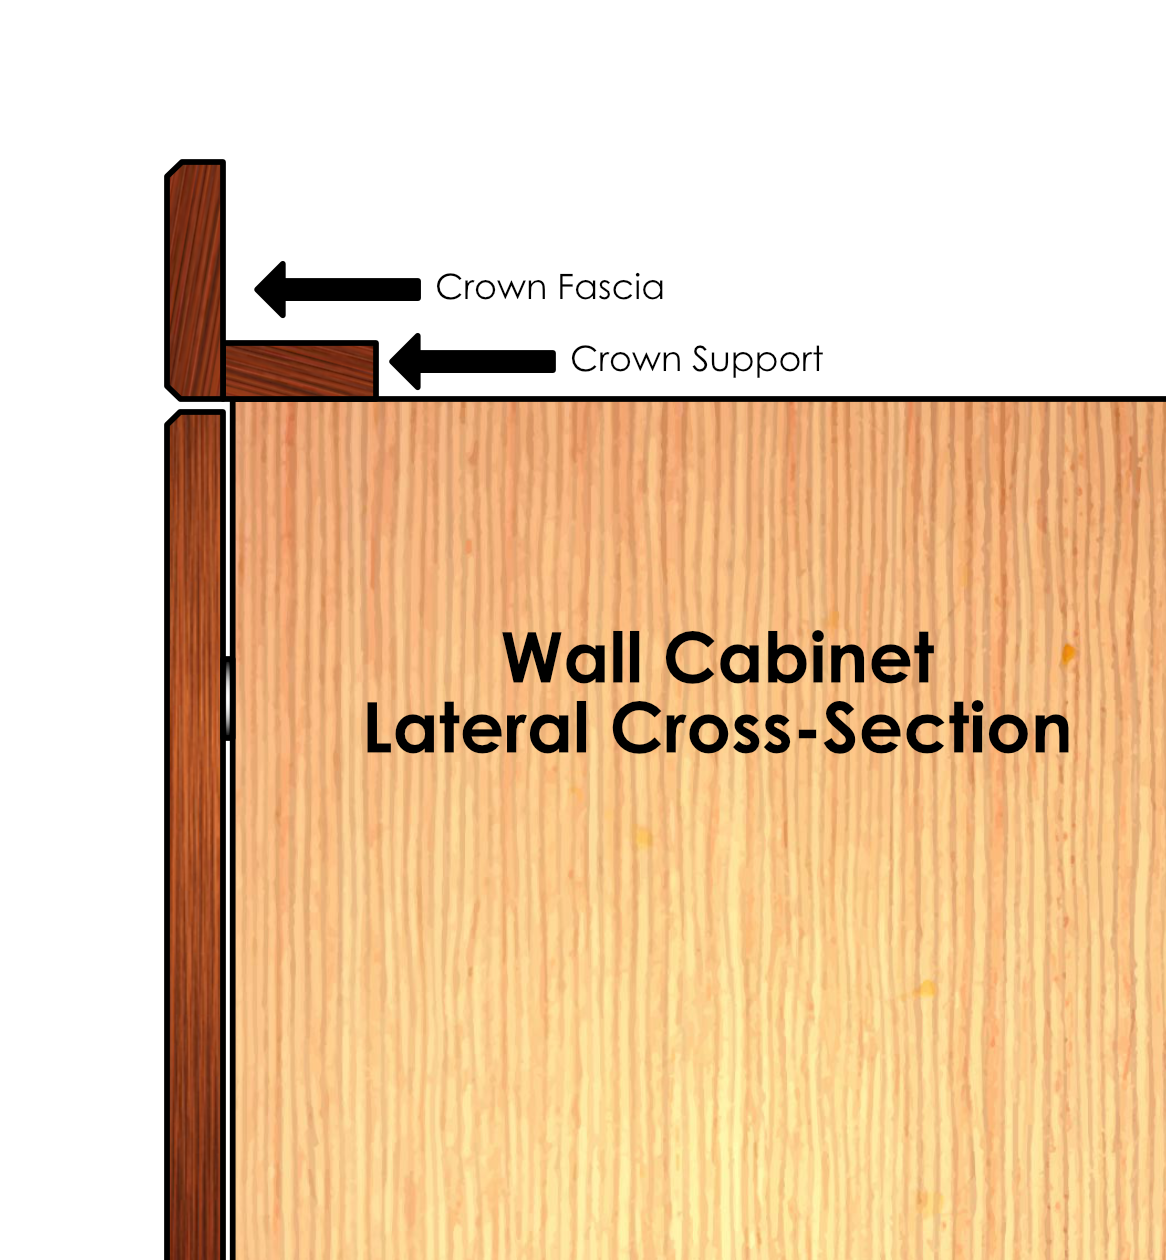
Straight Crown
A Straight Crown configuration consists of two pieces–Crown Support, and the Crown Fascia. In this case the goal is to get the Crown Fascia to sit flush with the door below it. In order to achieve this look, the Crown Support is installed so that it overhangs the cabinet box by the same distance that the door sits away from the door, which is 1/16". Since our Crown Fascia is the same exact thickness as our doors, when it is installed on the Crown Support it will appear to be perfectly flush with the doors on the cabinet below. The Crown Fascia can be made any height (up to 6") and can be made to bridge the distance between your cabinets and ceiling (if desired.) Typically the edges of the Crown Fascia are profiled to match or compliment the cabinet doors below. Both the lower and upper edges can be profiled with any of our edge profiles.

Full Stack
In frameless cabinetry, a Full Crown Molding Stack can be achieved with the following configuration. This consists of a Crown Support, a Crown Fascia, and the Crown Molding. This configuration allows you to install the diagonal Crown Molding at any elevation along the Crown Fascia without compromising the clean, professional look of the installation nor its structural integrity. The Crown Support and Crown Fascia function to give your 'crown build' a sturdy support structure that will give the lower, beginning of your stack a flush starting point with respect to your cabinet doors. From there, your Crown Molding can be installed at any height, potentially to dress up the junction between cabinet and ceiling; or, as is becoming increasingly common, exist purely as a stylistic element that bridges no gaps and hangs in the open air as is. The latter is more common in kitchens with vaulted ceilings.
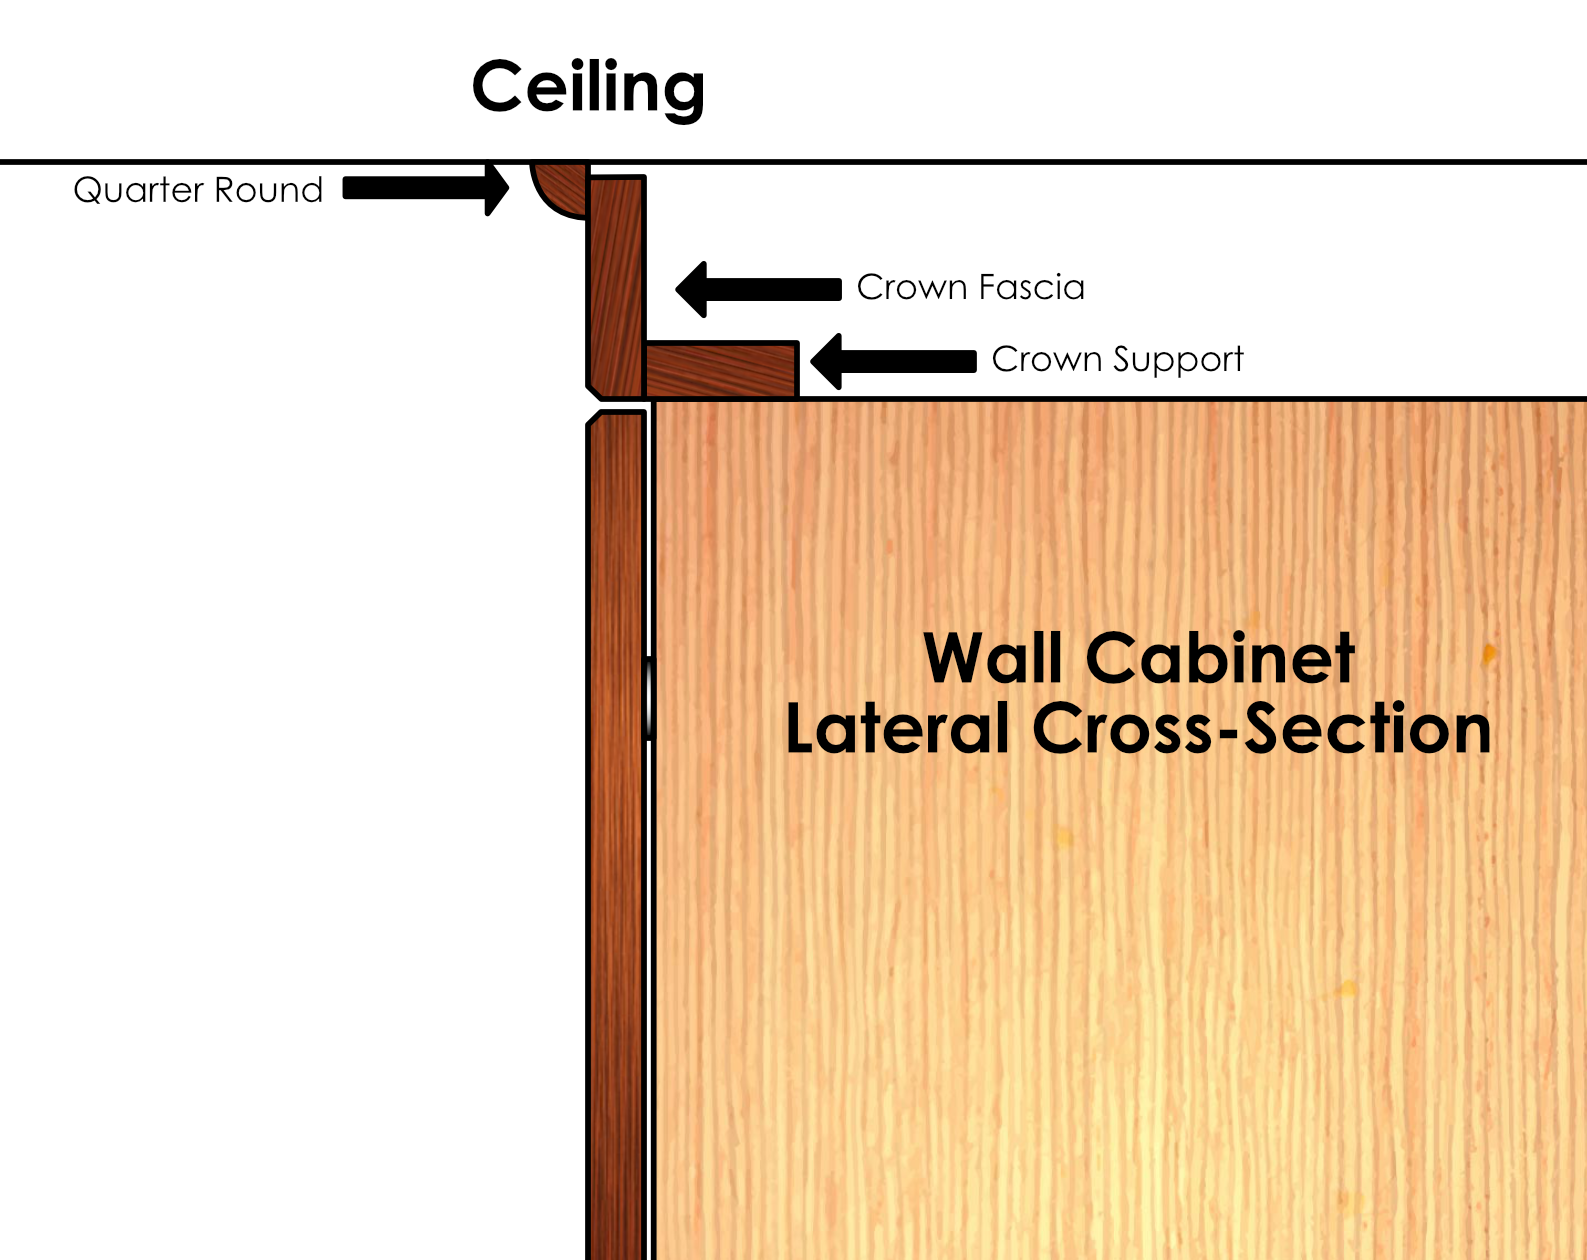
Fascia to Ceiling with QR
This configuration is a simple solution for bridging a small, unusable gap between your upper wall cabinets and the ceiling. In this case Crown Support and Crown Fascia are installed close to the ceiling. (The Crown Fascia is not butting into the ceiling to avoid noticeable gaps opening and closing due to seasonal shifts in your house.) The gap is then closed by installing Quarter Round molding the rest of the way to the ceiling. It is also possible to simply use Quarter Round molding at the top of your Crown Fascia as embellishment only if you have no desire to extend your crown molding to the ceiling.
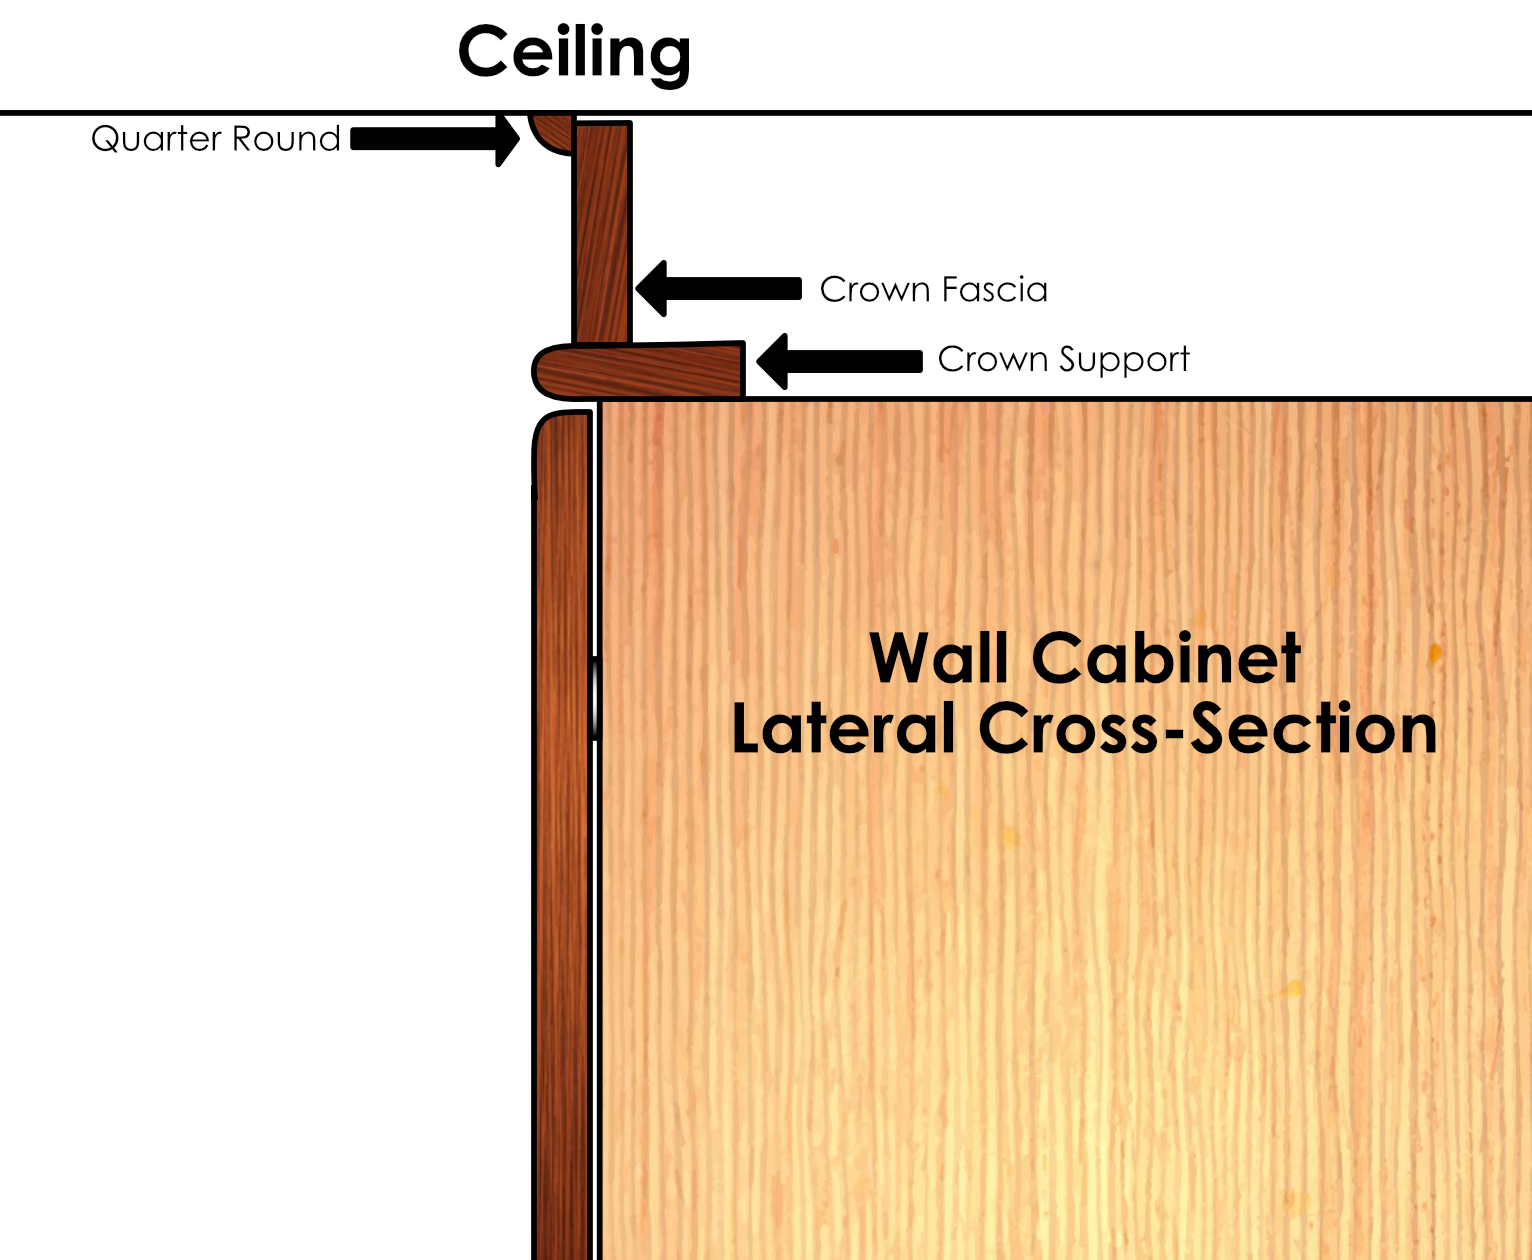
"I" Beam
In this configuration, a Crown Rail is used in place of a crown support in similar fashion to the "Fascia to Ceiling" configuration. When this build is finished with a Quarter Round at the top it gives illusion of an "I" Beam. It is not necessary to build this configuration to the ceiling as it will look good either way.
Soffit Solutions
If you are doing a partial kitchen remodel and are working around soffit, you may find it more difficult to know what to do. Here we have provided a few examples, just to give you some ideas of what's possible.
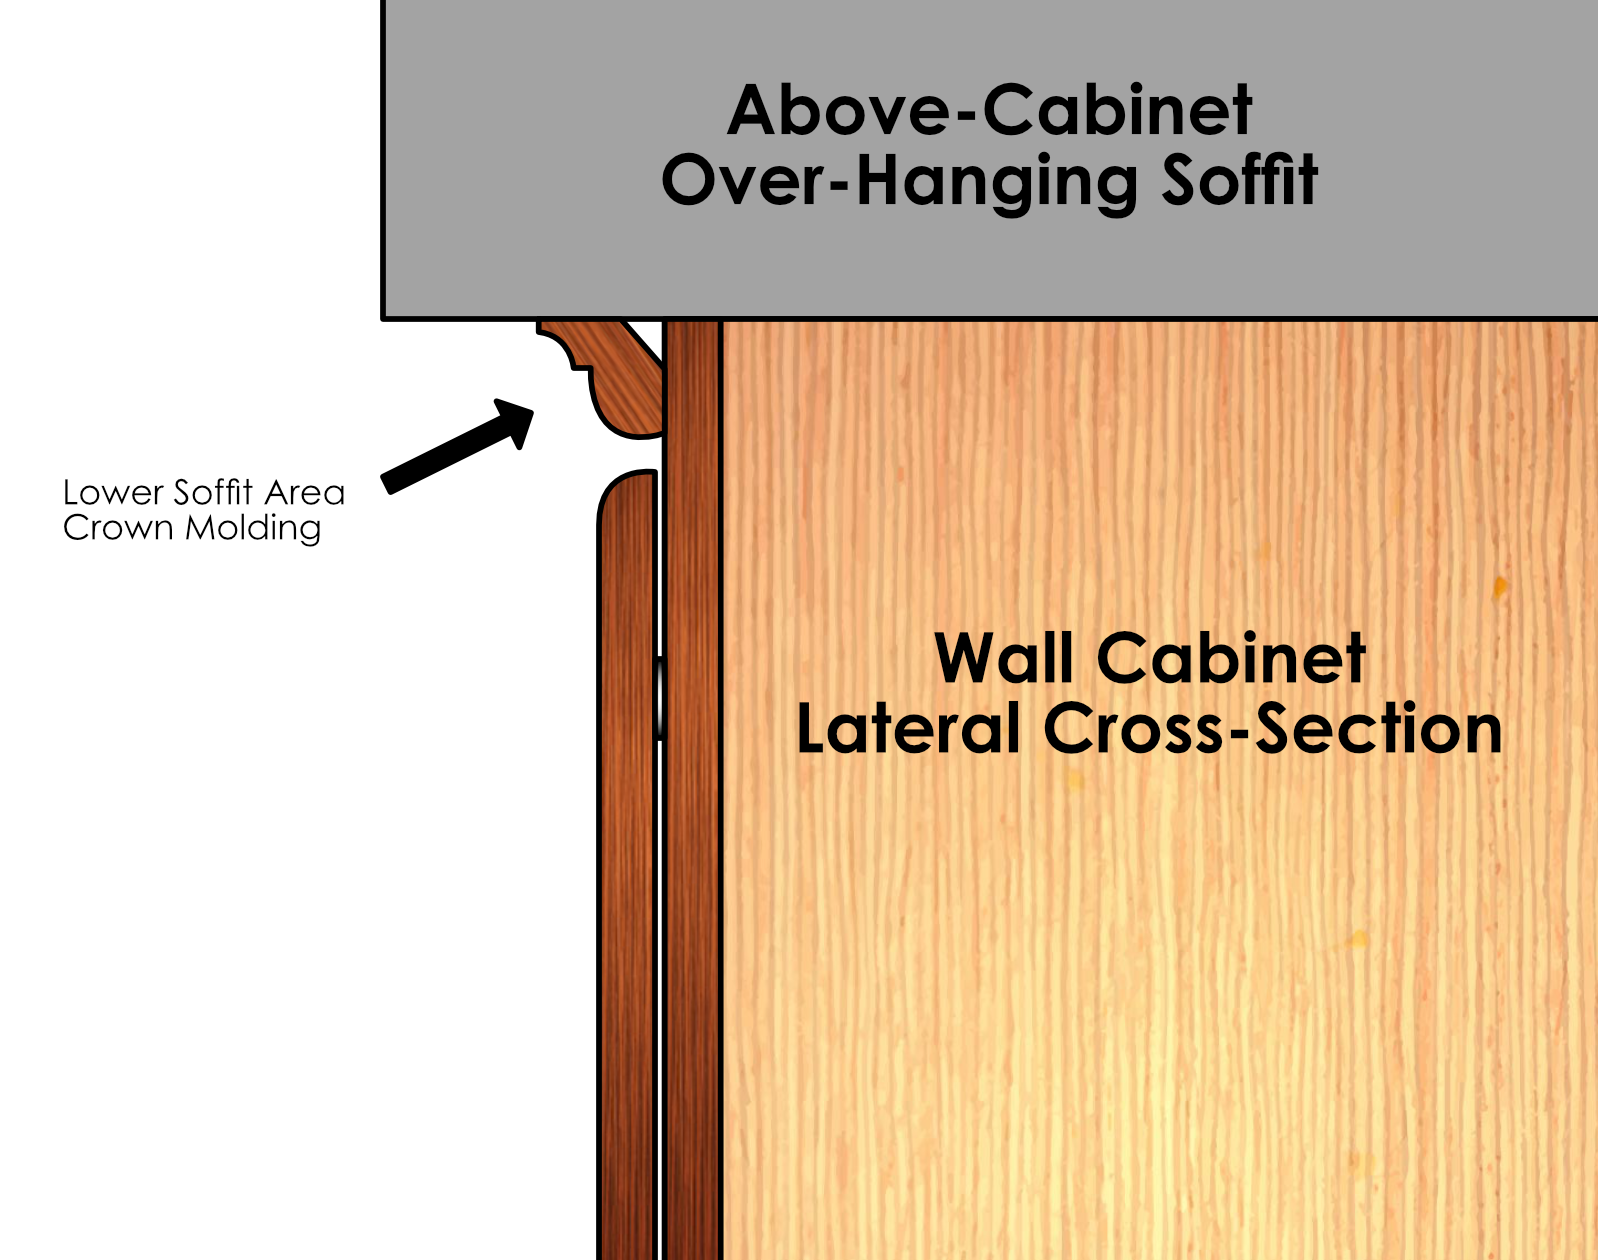
Over-Hanging Soffit
In some cases, soffit will provide you with a few tricky constraints with which to work with. In this example, only a very small area is provided that is in need of dressing up. Our Small Classic Crown Molding works great in small spaces and is shaped in such a way that the round-over element gives the appearance of matching the thickness and shape of the door below it.
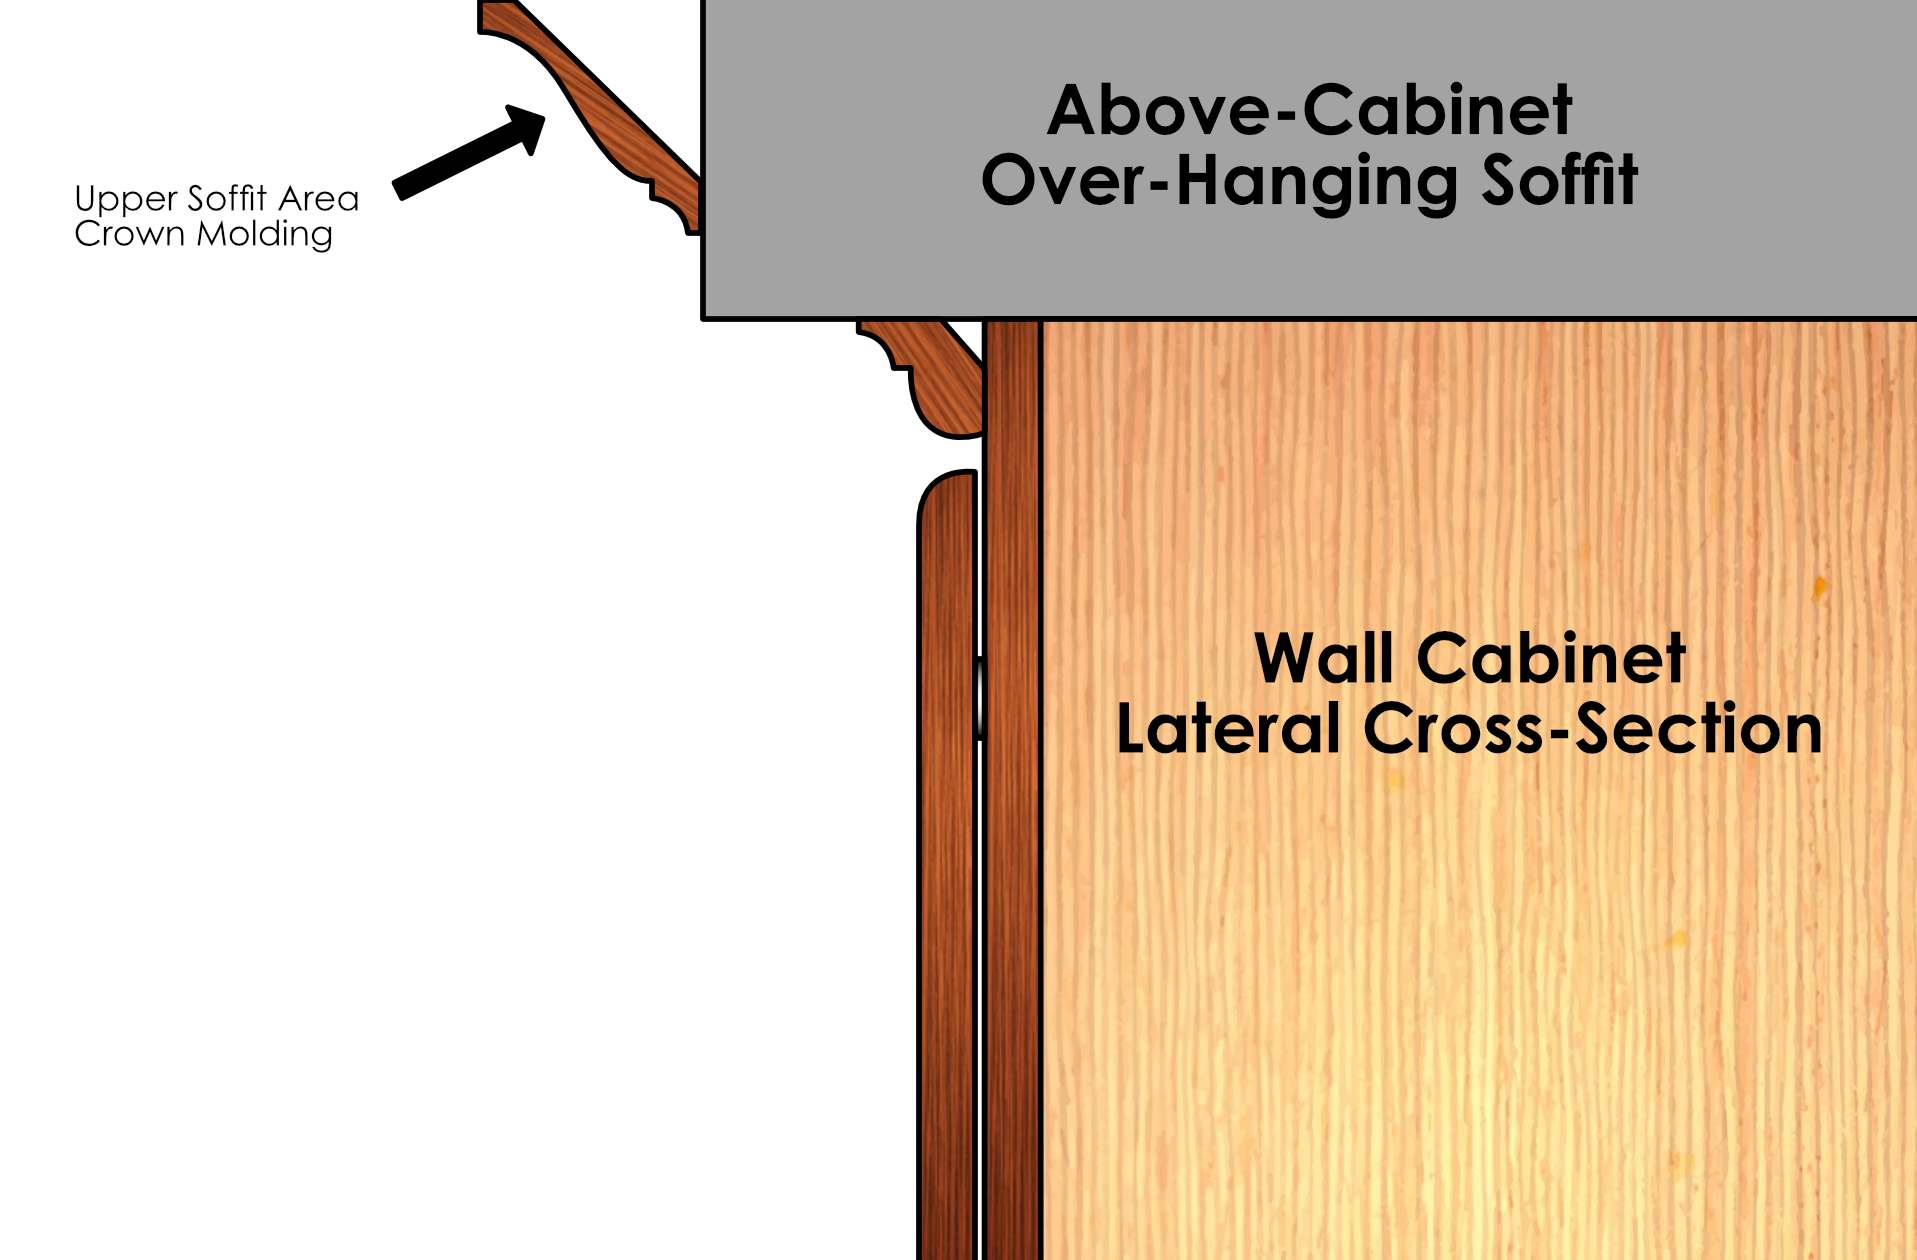
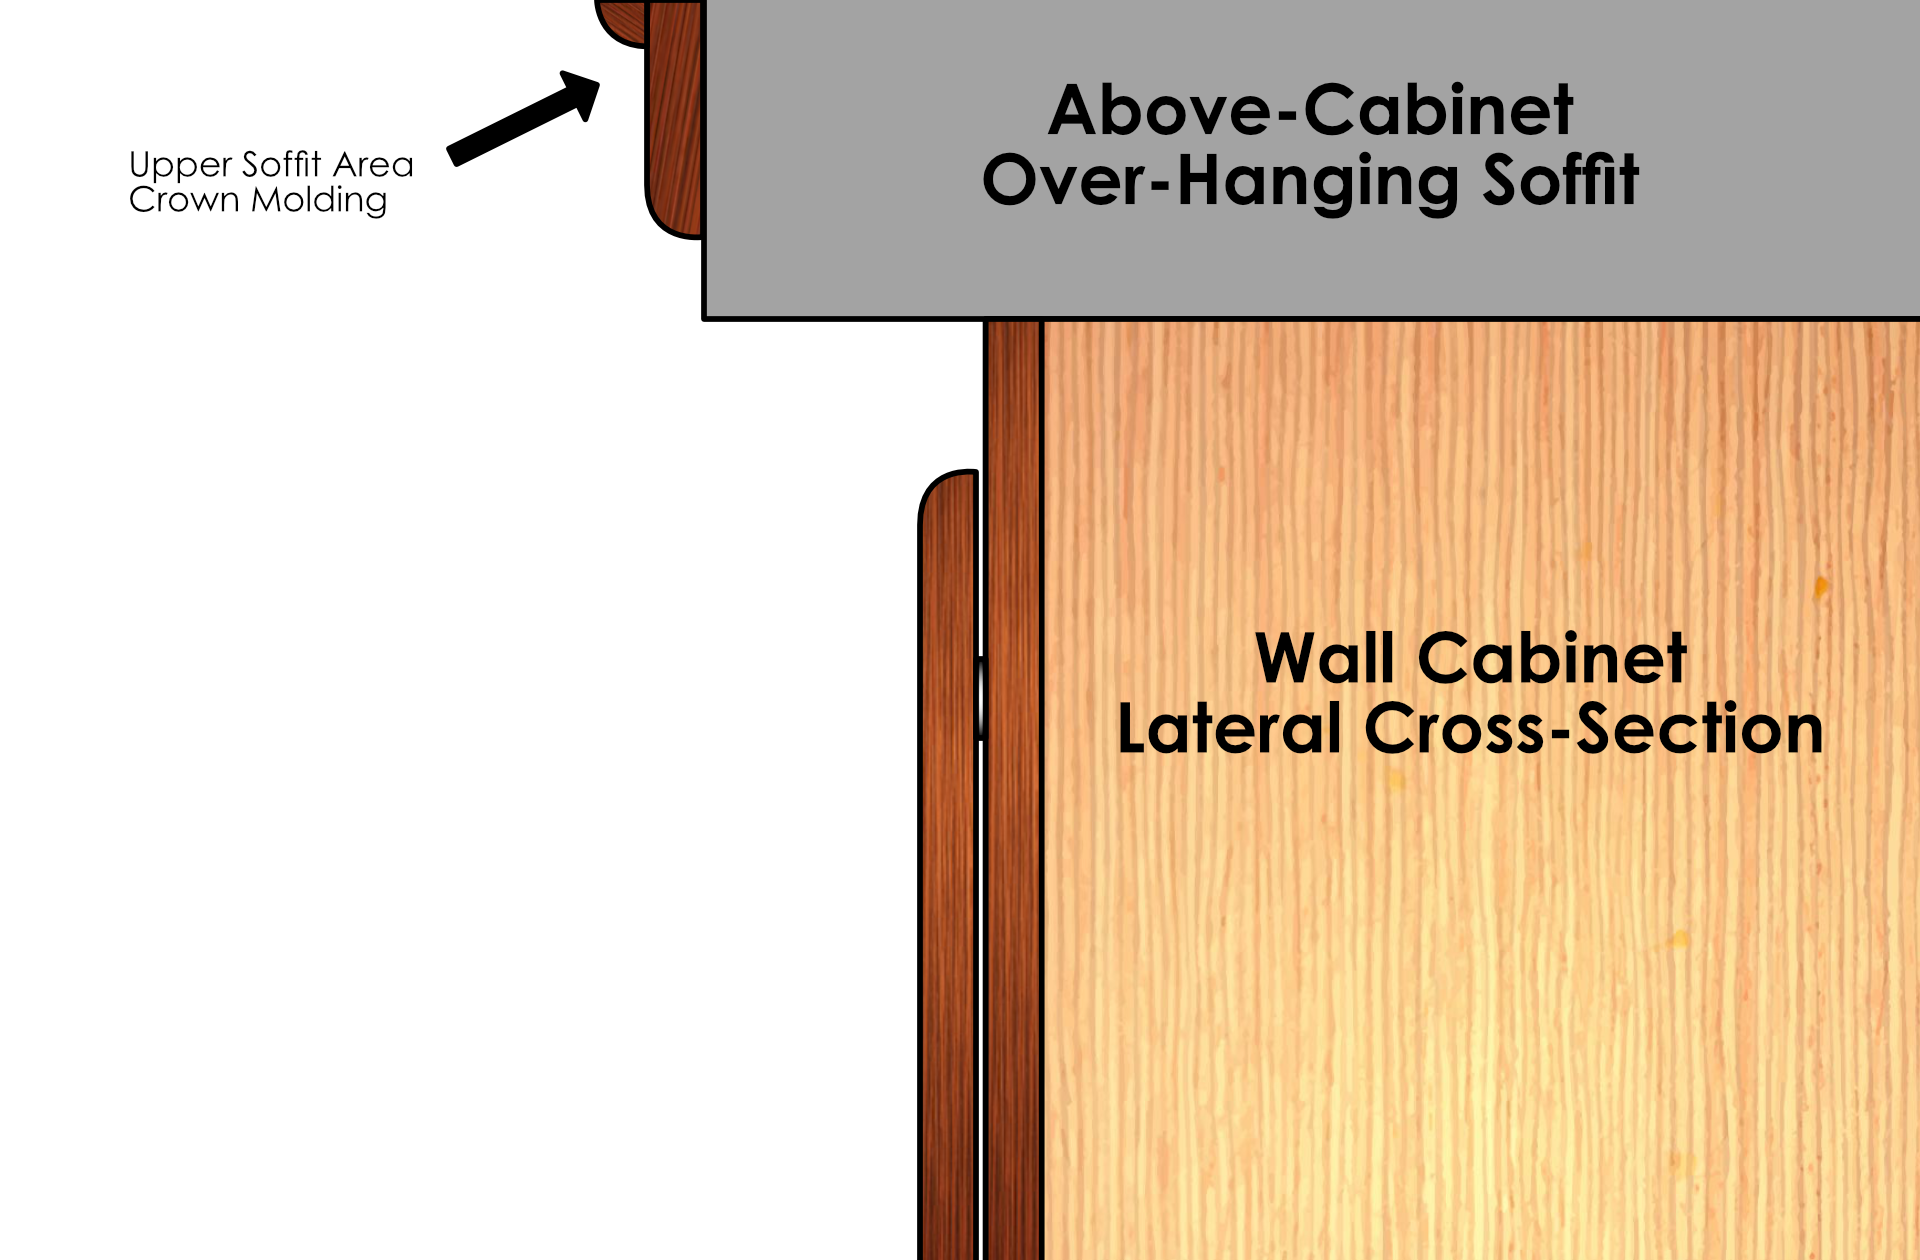
Trim the Upper Soffit Area Too!
One of the best ways to really tie the soffit into your cabinetry is to install matching Crown Molding at the junction between your ceiling and your soffit as well.
Below Cabinet Molding Configurations
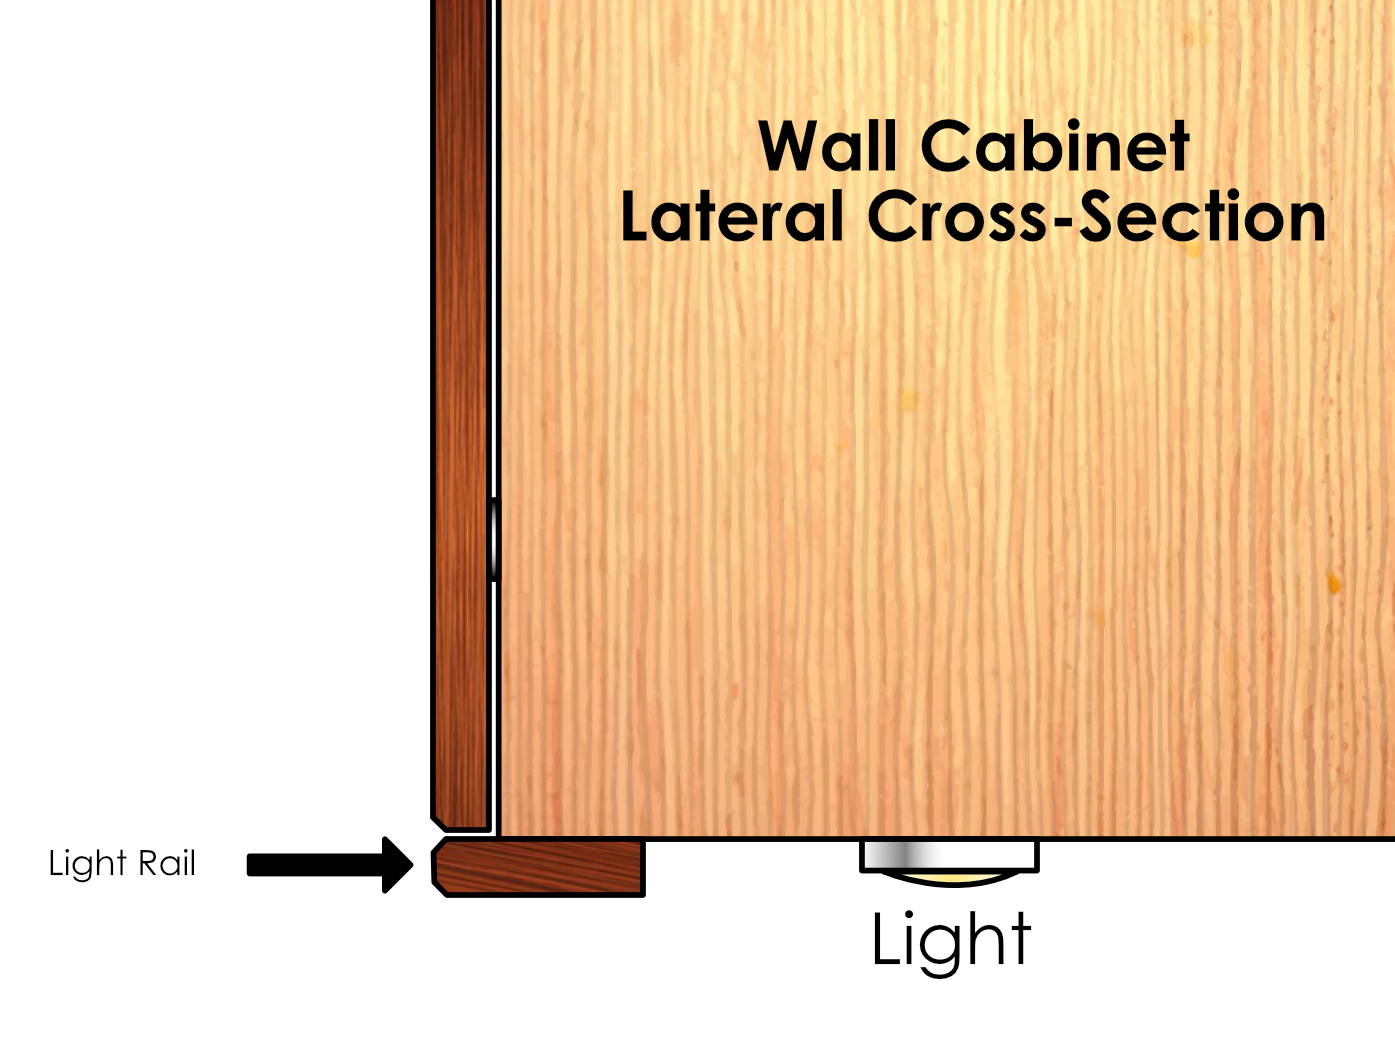
Light Rail
Light Rail is installed below your upper cabinets and serve the dual function of hiding light fixtures behind them and helping to give multiple cabinet divisions the appearance of being a single unit. If you plan on installing lighting of any kind underneath your frameless upper cabinets we highly recommend ordering Light Rail that matches your cabinetry and installing it as such (or in a similar manner as suits your style preference.)
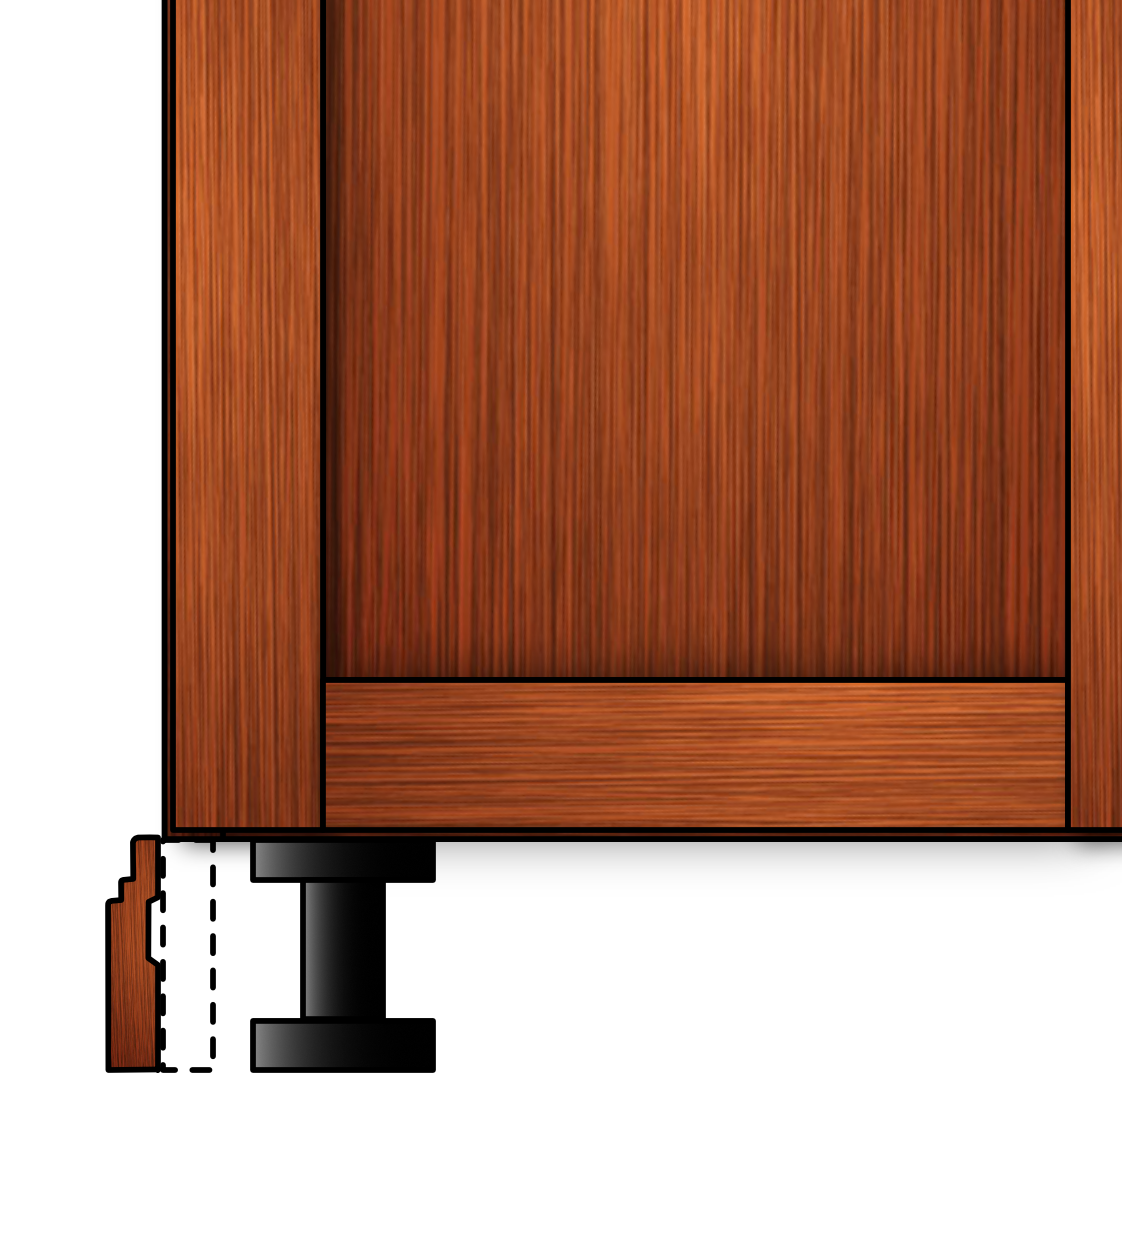
Decorative Toe Molding
When installing Decorative Toe Molding it is necessary to have some sort of build-up in the area below your base cabinet to act as a substrate to attach the Toe Molding to. Normally the substrate is installed flush with the cabinet box (a toe-kick board, or any other build-up of your choice would be installed in the area shown with a dotted line.) Your Decorative Toe Molding is then installed to the build-up using a brad nailer, using a hammer and trim nails, or by a different method of your choice.